To enable SSL on the HyNet GW, launch HyNet web server, and next…
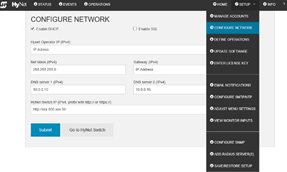
- Go to CONFIGURE NETWORK page from the SETUP dropdown menu (Fig 1)
- Check the box to enable SSL (Secure Socket Layer)
- Download SSL CA Certificate
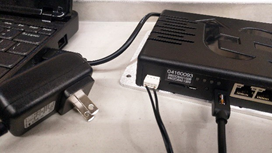
- Reset (power cycle) HyNet GW to invoke SSL | press RESET button on GATE OPERATIONS page of HyNet web server -OR- press physical RESET button on front of HyNet GW (Fig 2 & 3)
- Add the certificate to your web browsers Certificates Manager (Fig 4)
- Add a domain entry to your Windows hosts file, e.g. 10.5.15.150 hynet.com | The Windows hosts file is located in c:\windows\system32\drivers\etc\ folder (Fig 5)
- Open the web browser (Edge/Chrome/FireFox/Brave) and in the address bar enter the domain name you specified in your hosts e.g. hn1.hynet.com
- HyNet home page should indicate access using SSL (actually Transport Layer Security (TLS) since SSL has been deprecated) as shown in the web address https://hn1.hynet.com (Fig 6)

Fig 1 – CONFIGURE NETWORK page
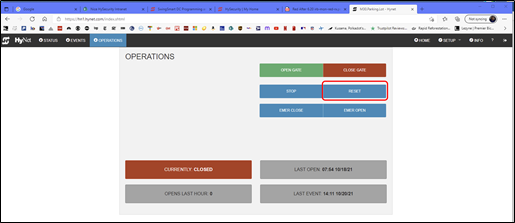
Fig 2 – GATE OPERATIONS page
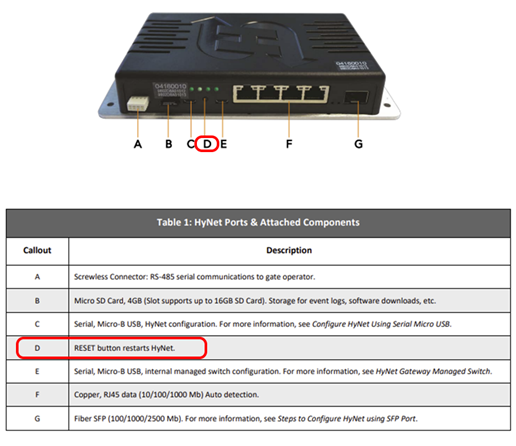
Fig 3 – HyNet Gateway SFP 4/1 - RESET Button (D) and microUSB ports (C & E)

Fig 4 – Add downloaded HyNet certificate to web browser Certificates
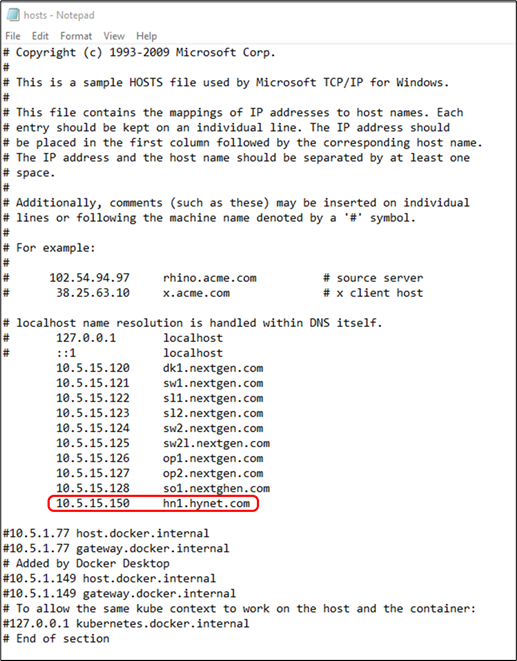
Fig 5 – Windows hosts file located in C:\Windows\System32\drivers\etc folder
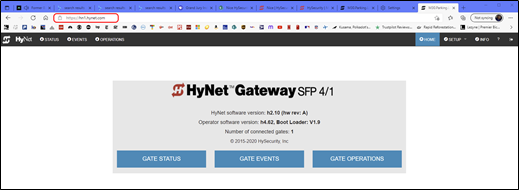
Fig 6 – Accessing HyNet GW home page in secure HTTPS mode
Resolving downlevel Transport Layer Security (TLS) on HyNet Managed Ethernet Gigabit Switch
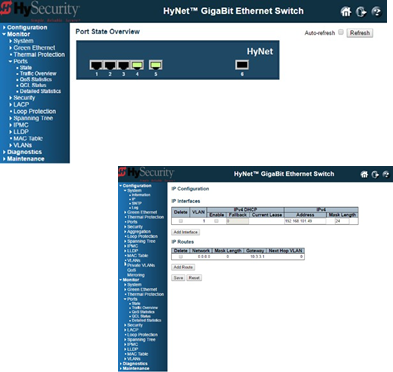
The HyNet GW is a hybrid device. It’s comprised of the HyNet component – RS-485 to Ethernet converter - and a 4 port gigabit switch with SFP (Vitesse). The HyNet firmware uses TLS v1.2 but the gigabit switch firmware is using TLS v1.0. (Fig 7)
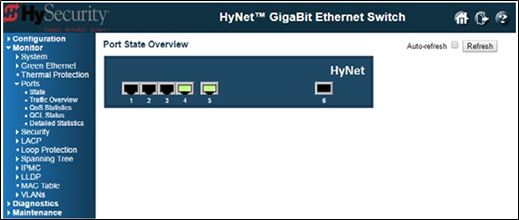
Fig 7 – HyNet Gigabit Ethernet Switch embedded Web Server page
The HyNet switch has a software image from 2015 and TLS is at v1.0. Some companies adhere to best practices concerning network security and may require TLS v1.2 as a minimum to support secure network standards. Infosec network scans of all connected IP addresses would indicate the software versions of network security software such as TLS. Currently, there are no plans to update the switch image to a newer version since the HyNet firmware does support TLS v1.2 The HyNet Gateway has had several updates and the current HyNet f/w is h2.10.
There’s really no way to disable the switch and have HyNet continue to function, but we can remove the IP address from the switch so it will not be detected and scanned by Infosec. There are two ways to remove the IP address from the switch - one using the graphical user interface (GUI) of the switch’s embedded web server and the other using Cisco router/switch commands via the switch’s command line interface (CLI). To access the switch’s GUI, simply enter the switch’s IP address in your web browser and the switch’s Home page is displayed. Under the System IP address configuration you can delete the IP address. Keep in mind that once the IP address is removed from the switch, the only way to access the switch to configure settings is using the CLI.

Fig 8 – HyNet Gigabit Ethernet Switch IP Configuration page. Check box under IP Interfaces to delete IP address.
The CLI requires connecting a microUSB cable from your laptop to one of the two microUSB ports on the front of the HyNet – left port is to access the HyNet’s CLI, while the right port is for the managed Ethernet switch. After connecting the microUSB cable to the appropriate port that you want to configure, use terminal emulation software such as PuTTY, TeraTerm, or Hilgraeve’s HyperTerm, and set your terminal emulator to 115K baud rate and 8/1/n/n (data bits/stopbits/parity/flow control). This is well documented in the HyNet User Guide (D0737) (HyNet Gateway User Guide – Nice | HySecurity Support Center) in the section 22.1 Configure the Managed Switch Using CLI, pages 28 & 29. The command that is not discussed in the User Guide is the command to remove the IP address which is no ip address for that interface.
To recap… the IP address of the managed Ethernet switch can be changed or removed using the switch’s GUI or CLI. However, if the IP address is removed and subsequently you need to have the IP address re-instated you will have to use the CLI to accomplish re-assigning an IP address to the switch.
* * *
Extracted from the HyNet User Guide (D0737 rev B)
10.1 CONFIGURE THE MANAGED SWITCH USING CLI
10.1.1 What You’ll Need
Review and obtain all items in What You Need to Begin along with the following:
- Micro USB Serial Cable Connection
- Terminal emulation software such as open source TeraTerm or Putty
- Knowledge of terminal emulation software system configuration
Remote Power Supply connection
Micro USB Connection for HyNet Managed Switch
 |
Remote Power Supply connection
Micro USB Connection for HyNet Managed Switch |
10.1.2 Steps to Configure the Managed Switch
NOTE: To configure the managed switch, use the port closest to the switch’s four copper ethernet ports. For a list of port callouts and their descriptions, refer to HyNet Components.
Plug the remote power supply (MX3980) into the HyNet Gateway. Plug the opposite end into a standard AC outlet.
Connect the USB end of the serial cable to your laptop and the other micro end to HyNet.
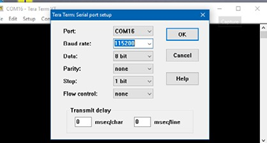
Access and configure terminal emulation software, as shown below, then click Enter/OK to invoke the command line interpreter (CLI) to begin the
log in process.
Configure the serial port to:
- Baud rate: 115200
- Data: 8
- Parity: none
- Stop: 1
- Flow control: none
NOTE: Type “>help” (Shows a list of commands).
Configure the HyNet Gateway to your local area network.
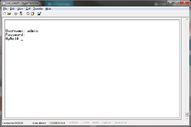
User name is “admin” and the default password field is blank.
Username: admin Password:
CAUTION!: Protect your accounts from internet hacks!
HySecurity highly recommends that the customer, upon
establishing network connection with HyNet Gateway, immediately change the default passwords on the Admin, User and Installer accounts and HyNet managed switch, so each has a unique login and password.
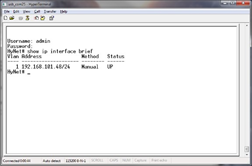
10.1.3 Determine Switch IP Address
To view the current IP address of the managed switch’s web server:
At the “HyNet#” prompt, type “show ip interface brief” and press Enter.
Record the IP address for use in your browser address field.
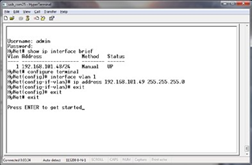
10.1.4 Set Fixed Switch IP Address
If you wish to set a new fixed IP address for the switch:
- At the “HyNet#” prompt, type “configure terminal” and press
- At the next prompt, “HyNet(config)#”, type “interface vlan 1” and press
- At the next prompt “HyNet(config-if-vlan)#”, type the desired IP address and net mask. For example, “ip address 192.168.101.49 255.255.255.0”, and press
- To return to the top level menu, type “exit”, and press Enter three
- At this point, SAVE the changes with the command line “copy running-config startup-config” and press
- When the save is complete, exit the
NOTE: If you do not take the last step to save an IP or DHCP configuration, the configuration settings are lost during the next system reset.
If you wish to check network connectivity from the switch to other devices, use the “ping” command.
10.1.5 Set Switch to DHCP
If you wish to set DHCP for the switch:
- At the “HyNet#” prompt, type “configure terminal” and press
- At the next prompt, “HyNet(config)#”, type “interface vlan 1” and press
- At the next prompt “HyNet(config-if-vlan)#”, type the “ip address dhcp”, and press
- To return to the top level menu, type “exit”, and press Enter three times.
- At this point, SAVE the changes with the command line“ copy running-config startup-config” and press
- When the save is complete, exit the CLI

NOTE: If you do not take the last step to save an IP or DHCP configuration, the configuration settings are lost during the next system reset.
If you wish to check network connectivity from the switch to other devices, use the “ping” command.
10.2 CONFIGURE MANAGED SWITCH VIA WEB INTERFACE
Using a web browser, go to the IP address of the managed switch. If you don’t know the IP address, contact your IT department. You can also obtain or set the IP configuration via the USB interface. See Configure the Managed Switch Using CLI.
NOTE: Business protocols and managed switch options are beyond the scope of this user guide.
The CONFIGURE NETWORK page can be set up to provide one-button access to the managed switch's web server.
- Enter the managed switch IP address (with http:// or https://) into the field and save it to HyNet with the SUBMIT button.
- in the future, you only need to push the
"Go to" button to open the managed switch server page.
Contact your IT department for additional network security setup information. The HyNet is configured to work like a basic router switch and no additional setup is required unless your business has specific firewall protocols or other network security needs. The HyNet managed switch is capable of Layer 4 Switch actions and applications. Help is available online via the “?” in the upper right corner.
10.2.1 Change Managed Switch IP address
- In the left column, click ‘Configuration’-> ‘System’ -> ‘IP’.
- At the IP Configuration display, you can change the basic IP configuration of the online switch interface:
NOTE: When you finish making changes to the managed switch, YOU MUST SAVE THE CONFIGURATION!
10.3 SAVE MANAGED SWITCH CHANGES
The changes you make to the Managed Switch do not take
place unless you save the configuration. If you do NOT take the following steps to save changes, the next reboot will restore the managed switch’s previous configuration.
To save your changes, take the following steps:
- In the left column, click ‘Maintenance’ -> ‘Configuration’ -> ‘Save startup-config’
- Click ‘Save Configuration’. Otherwise the next reboot will restore the previous configuration: